写在前面
ONetSwitch是我们实验室自主设计研发的,基于Xilinx Zynq器件的SDN交换机。ONetSwitch具有从硬件逻辑到软件控制全可编程的特点,因此这是一个非常理想的SDN科研平台。目前也确实有不少科研团队在使用,主要包括我们实验室。
正是由于ONetSwitch在软硬件方面都提供了非常灵活的可编程性,ONetSwitch交换机整套系统的使用就变得非常复杂:硬件层面的可编程性要求你得非常熟悉Xilinx Vivado环境下的FPGA开发,软件层面的定制需要你熟悉Xilinx Zynq AP Soc平台的设计。
虽然在Github wiki上有比较详细的介绍,但是对于刚刚接触ONetSwitch,又想快速进行科研实验的新手(主要是学生们)来说,这个过程还是有一定的困难。我接触ONetSwitch一年多了,主要做的是软件层面的工作,踩了很多坑,也积累了一些经验。因此我在这里写出来,分享给OnetSwitch的用户们,也给实验室的学弟们一些快速入门的资料。
OnetSwitch软件系统
OnetSwitch采用的是Xilinx家的Zynq芯片,那么所运行的软件自然得按照Xilinx的基本法。因此软件开发的基本流程遵循Xilinx Zynq Soc的设计流程, 如图1所示。
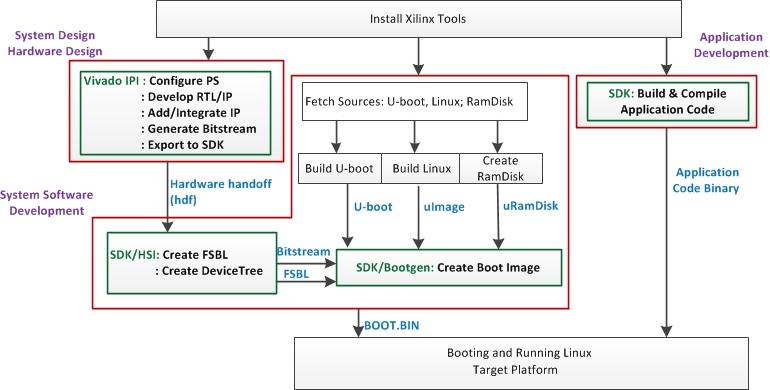
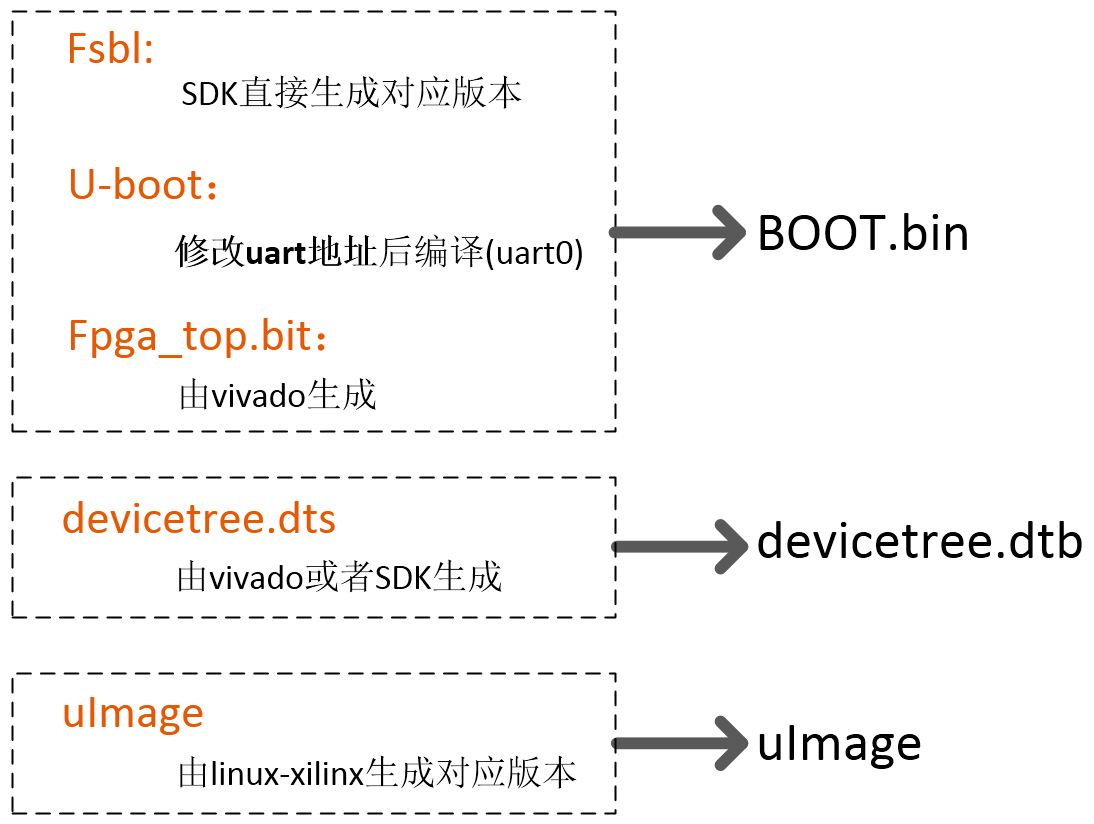
OnetSwitch启动时的软件一般配置为从SD卡读取,这个SD卡相当于整个系统的硬盘。启动时必要的文件有三个:(1)boot.bin, (2)uImage, (3)devicetree.dtb。生成这三个文件的必要过程如图2所示。
devicetree.dtb:设备树文件devicetree.dtb由对应的源文件devicetree.dts编译而成。源文件devicetree.dts的生成比较简单,既可以直接让SDK根据硬件工程的描述生成,其中硬件工程的描述由FPGA设计工具vivado提供。也可以直接在vivado上生成devicetree.dts文件。后续不做详细讨论。
uImage:uImage就是Onetswitch的嵌入式Linux内核,包括了所有的硬件驱动。
boot.bin:boot.bin也是由SDK生成,至少需要三个文件:fsbl.elf, U-boot和fpga_top.bit。
OnetSwitch U-Boot的生成
(1)首先需要修改uart值
找到文件u-boot-xlnx/include/configs/zynq_zc70x.h,定位到这一行:1
#define CONFIG_ZYNQ_SERIAL_UART1
将其修改为:1
#define CONFIG_ZYNQ_SERIAL_UART0。
(2)需要配置交叉编译
执行以下shell命令:1
2export CROSS_COMPILE=arm-xilinx-linux-gnueabi-
source /opt/Xilinx/SDK/2015.2/settings64.sh
(3)编译uboot
All commands have to be executed in you u-boot source directory.
The first step is to configure the sources for the intended target.To build U-Boot for OnetSwitch45(zc706) execute:1
2
3make zynq_zc706_config
or use 'make zynq_zc70x_config' for version <= 2015.2
make
After the build process complets the target u-boot elf-file is created in the top level source directory, named ‘u-boot’. Additionally in the tools/ directory the ‘mkimage’ utilty is created, which is used in other tasks to wrap images into u-boot format.
(4)记录mkimage工具的路径
To make mkimage available in other steps, it is recommended to add the tools directory to your $PATH.1
2cd tools
export PATH=`pwd`:$PATH //此处pwd的路径就是mkimage工具的位置,我们用PATH_to_mkimage_tools来表示`pwd`执行的结果
相关参考:Description-U-Boot for Zynq AP SoC
OnetSwitch Linux kernel的生成
(1)需要配置交叉编译1
2export CROSS_COMPILE=arm-xilinx-linux-gnueabi-
source /opt/Xilinx/SDK/2015.2/settings64.sh
(2)配置mkimage工具的环境变量
此处需要用到编译uboot得到的PATH_to_mkimage_tools1
export PATH=PATH_to_mkimage_tools:$PATH
(3)配置内核参数
The kernel is configured based on linux-xlnx/arch/arm/configs/xilinx_zynq_defconfig:1
2make ARCH=arm xilinx_zynq_defconfig
make ARCH=arm menuconfig
(4)编译内核
To produce the kernel image:1
make ARCH=arm UIMAGE_LOADADDR=0x8000 uImage
In the process, linux-xlnx/arch/arm/boot/Image and linux-xlnx/arch/arm/boot/zImage are created. The Image file is the uncompressed kernel image and the zImage file is a compressed kernel image which will uncompress itself when it starts.
If the mkimage utility is available in the build environment, linux-xlnx/arch/arm/boot/uImage will be created by wrapping zImage with a U-Boot header.
相关参考:Description to Linux for Zynq AP SoC